
This post may contain affiliate links. If you click on them, I may earn a small commission.

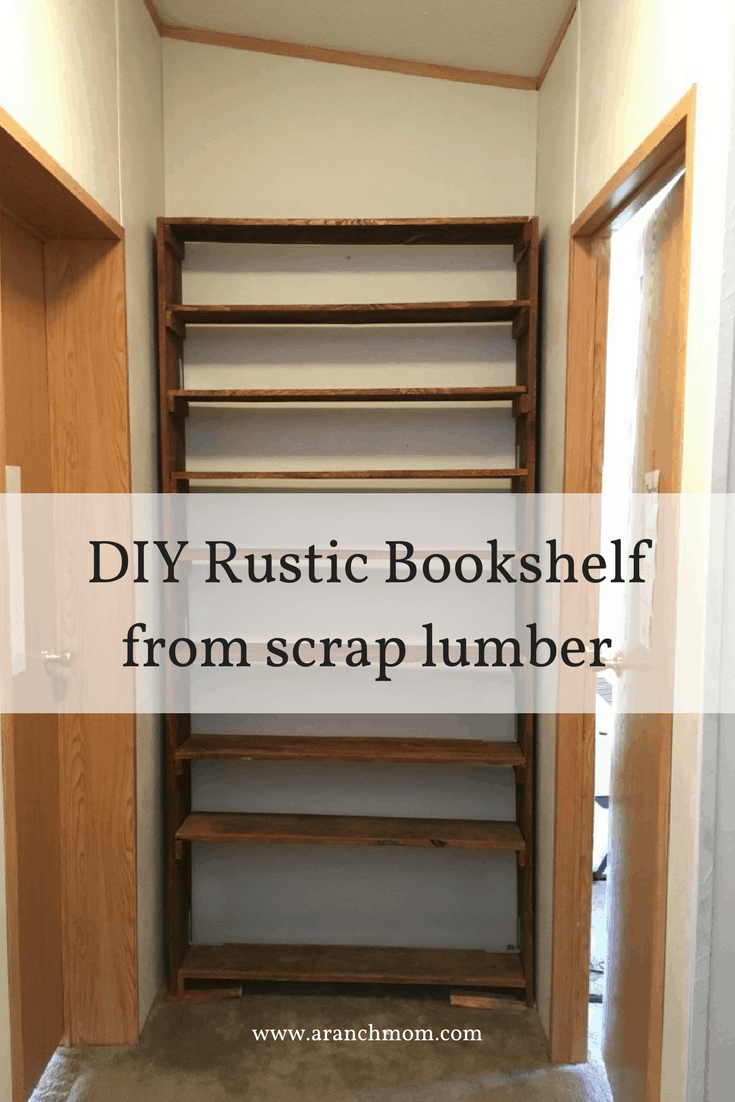
I have a lot of books, and never enough bookshelves! Last year, we moved into a small doublewide, and I decided to make a rustic, DIY bookshelf from scrap lumber. It turned out pretty good, considering the fact that I am not very good with tools. 😀
I have the privilege of a bunch of scrap lumber stashed around, so I used what I had on hand. It cost me the price of a can of stain and a box of screws. (I know not everyone has this luxury!)
Tips to find scrap lumber cheap or free:
- Local facebook buy/sell groups. I have seen scrap lumber or old pallets on those.
- Craigslist. Look in the FREE section, as well as MATERIALS and FARM sections.
- Rural friends. Maybe you have a farmer friend, or a rancher neighbor who has some leftover lumber...

So I dug out some boards, and my tools, and started on my DIY bookshelf.
Tool List:
- Saw. I have one similar to this one on Amazon.
- Tape measure. I like this kind.
- Builder's pencil. (optional)
- Yardstick & ruler. Just because sometimes they are faster for me than a tape.
- Wood Screws.
- Corner Braces.
- Gorilla Glue®
- Stain. I used a pint of stain. I used a type of all-in-one stain. I believe I used Walnut color. I bought it at Walmart®.
- Speed Square like this. (optional)
- Cordless drill. My husband has one similar to this one.
- Wood drill bit, very thin size.
- Safety glasses.
- Earplugs.
After gathering my supplies, I began by staining each board. I only stained the top & edges, because I wanted the can of stain to last for the whole bookshelf, and I figured no one would be looking at the underside of the shelves!

Then I measured my hallway, so I would know how wide to make the bookshelf. I measured and marked each shelf, and cut to length with the saw. This was a very specific size, made for a specific space in my house. I hesitate to give measurements because of that
Dimensions:
Width of shelves: 40 inches
Height of shelf: 83 inches
Depth of shelves: 9 inches
Distance between shelves: Varies. From at the 8 inches at the top, to 15 inches at the bottom.

The long boards are the side pieces, the shorter ones are the shelves, and the tiny ones are supports for the shelves. (I'll explain those later)

Here, I have laid out all my pieces in the way I will use them. My boards were not the same width, so I wanted to be sure the wider ones would be on the bottom, where the bigger books will be stored. Hopefully, your boards will be more uniform in size, haha! Mine were slightly warped, too. Rustic, right?!

I measured a few inches from the bottom of the side boards, to give the shelf some 'legs'. I just thought it would look better.

After everything was stained and cut, I measured where I wanted each shelf. I like to use the speed square for this job. It is quick work to put the edge of the square against the board and mark with my pencil, but it is not a necessity!

Pro Building Tip:
One of the most helpful things when screwing wood together - especially narrow shelves - is to drill guide holes first. This may seem unnecessary, but if you are using any kind of hard wood, you will be so glad you did! You just find a thin wood drill bit, and drill holes where you are going to put your screws. This prevents splitting wood on the narrow shelves, or if you are close to an edge. It also makes the screw go in a bit easier in hard wood, no stripping and going in crooked!
Maybe your husband doesn't have a toolbox full of handy items, but if he does, or if you can buy one drill bit, I highly advise to do so. I did not write down the bit size I used, but my highly unscientific method is to rummage until I find a drill bit that is about 1/4 the size of my screw. In diameter, that is. You just want a tiny hole, so the screw still gets tight.

Assembling the bookshelf:
After I drilled the guide holes, I screwed each shelf support onto the bookshelf sides. This is not strictly necessary, but gives a lot of extra support so the loaded bookshelf doesn't collapse. I did this on both side pieces.
Then, I put a line of gorilla glue in between the end of each board and the side piece. Again, not strictly necessary, but I have dealt with so much junky furniture, that I wanted this to be as solid as possible!
I rested each shelf on top of the supports, and screwed them in from the outside. I drilled guide holes in these, too. The first shelf was tricky, but after I had one shelf end screwed in, the rest went easily.

Here you can see the finished shelf. You can kind of see the corner braces in the bottom shelf, and again on a shelf about halfway up. They just gave the shelf a bit more support - firmed it up. I didn't want to put a back on, because I knew that would make it monstrously heavy! If I make another one, I would try to buy some thin plywood or something to tack on the back.
But overall, I was quite happy with how my DIY bookshelf turned out! It is functional, practical, and fits in with the rest of our rustic decor.

You can see that the shelves are closer to together at the top, and a further apart at the bottom. I have a lot of coffee table books that don't fit in a traditional bookshelf, so I made a shelf where they would fit. The top shelves only hold small books. But I have so many books that I wanted as many shelves as possible! 😀 It is working beautifully! It carries a lot of books, and is solid.
I would recommend you attach some steel wall mounts to the back of the shelf, and screw it to the wall. This is a heavy, tall shelf, and I would hate to see it fall over. You can find some on Amazon for a few dollars:

[bctt tweet="Who cares if it isn't perfect?? Life is more interesting when you make your own stuff." username="aranchmom"]

I hope this has inspired you to look around for scrap lumber to build yourself a DIY bookshelf! Measure that space, make whatever size you need. It is fun to create and build! Who cares if it isn't perfect?? Life is more interesting when you build your own junk. 😉
Have you built anything fun recently? Are you going to attempt to build a DIY bookshelf? I would love to hear how yours turns out!
Save this post to Pinterest so you can find it later.


Leave a Reply